Please review the following common issues for VMC on AWS labs thats students and instructors may face.
Unable to add on-premises Active Directory over LDAP as an identity source when linking from Cloud SDDC
Symptoms
- Error – Failed to probe provider connectivity [URI: ldaps://xxx.xxx.xxx:636]; tenantName [vclass.local], userName [xxxxx] Caused by: Can’t contact LDAP server

Cause
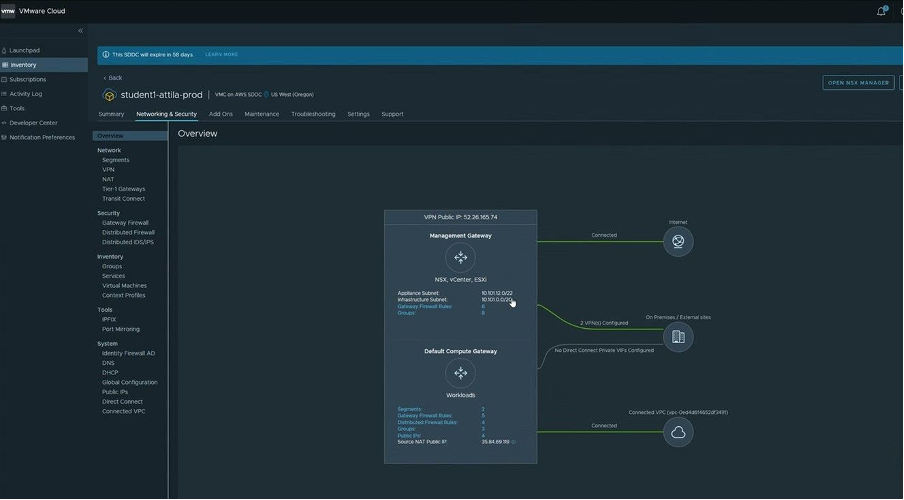
- User misconfiguration in Infrastructure Subnet while setting up Policy based VPN. The subnet should be /20.
Solution
- Verify Infrastructure Subnet from VMware Cloud -> Inventory from navigation pane -> click overview under Networking & security.
- Reconfigure Policy-based VPN in the VMware Cloud and provide correct Ip range for Infrastructure Subnet.
- Restart VPN from Vyos
- Connect to Vyos appliance and run command: restart vpn
- Verfiy VPN tunnels are up with command: show vpn ipsec sa
- Restart VPN from Vyos
- Connect to Vyos appliance and run command: restart vpn
- Add on-premises Active Directory over LDAP as an identity source.
If you are receiving an error message about not b
Layer 2 VPN will not establish
Layer 2 VPN will not establish
Symptoms
- Layer 2 VPN is down
- Layer 2 VPN is in a degraded state
Cause
- ACS will provide best-effort support for all issues which are related to VPN if it is not an infrastructure issue
- VPN issues are usually caused due by a configuration error, eg: incorrect local IP, remote IP, or steps not followed correctly in the lab guide.
Solution
- Login to the vCD -> access the vCD tenant portal -> search for the vApp using the NEE_ID and connect to the student VM using the web console.
- Students for the VMC on AWS course fill out a word document with all required details as they progress through the course, if using values from here always double-check they are correct yourself.
- Double check the “on-prem”
- details are correct.
- Check l2 VPN public IP, from Powershell, run cd command to change the directory to C:\Tools\
- Run the L2_public_IP.ps1 PowerShell script to return the L2 public IP
- Using the lab guide verify the configuration of VMC on AWS side VMware Cloud Services – Log In it is best to log in to the cloud console from the student VM :
- Click the Networking & Security tab >> Under Network, select VPN >> Click the Layer 2 tab.
- Verify that the IP address selected under Local IP address is the Public IP1 address.
- Remote Public IP is the public IP address retrieved earlier from the PowerShell script.
- Verify remote private IP is 172.20.255.79
- Download the VPN configuration to the Student desktop, you will use this to make sure the “on-prem” parameters are correct.

If all above seems to be correct we can now check the on-prem parameters. From the student desktop, open a browser to https://sa-auto-edge-01.vclass.local/login and login with admin/VMware1!Vmware1!
The easiest method to check parameters is to rebuild the config.
Delete the current config by performing the following:
- Click L2VPN in the left menu >> click detach port >> then click the menu button next to the session and delete it.
- Click PORT in the left menu and delete the port info named “VLAN_10”.
- Once the student config is removed make sure the preconfigured port is there.

- if this port has been removed by the student or does not exist the VPN will not establish.
- If needed recreate this port with the following parameters.
- Name > Irport_0
- Subnet > 172.20.255.79/24
- Vlan > 0
- Once this is created recreate the VPN config as per the lab guide.
- Click PORT in the left menu >> Click ADD PORT >>Enter VLAN_10 in the Port Name text box >> Enter 10 in the VLAN text box >> In the Exit Interface drop-down menu, select eth2 >> Click SAVE.
- Click L2VPN in the left menu >> Click ADD SESSION >> Enter L2_VMC in the Session Name text box >> Enter 172.20.255.79 in the Local IP text box >> In the Remote IP text box, enter the VPN Public IP recorded in your workbook.txt >> In the Peer Code text box, paste in the peer_code from the L2VPNSession_L2VPN_config.txt file that you downloaded earlier.
- The bit needed is between the double-quotation marks like below.

- Click ATTACH PORT In the Session drop-down menu, select L2_VMC >> In the Port drop-down menu, select VLAN_10 >> Enter 100 in the Tunnel ID text box >> The tunnel ID must match at the source and destination >> Click ATTACH >> Click REFRESH and verify the status of the session appears as UP now.
Network extension: This network is on the DVS which is not part of the selected service mesh and cannot be extended
Symptoms
- Unable to stretch network
- Warning that network is on DVS on the extension page
Cause
- User misconfiguration
Solution
- Reconfigure Network profile, pay attention to the IP range for the MGMT network in HCX.
- Re-sync service mesh.
Unable to find a service Mesh for the selected scope with cluster
Symptoms
- Unable to migrate VM
- Unable to find a service Mesh for the selected scope with cluster pair, on the migration page
Solution
- Edit the Compute cluster in HCX and verify selections
- Re-sync service mesh.
Live Migration (vMotion) failed
Symptoms
- Error: The vMotion failed because the destination host did not receive data from the source host on the vMotion network. Please check your vMotion network settings and physical network configuration and ensure they are correct. Migration [-xxxxxxxxxx:xxxxxxxxxxxxxxxxxx] failed to connect to remote host <x.x.x.x> from host <x.x.x.x>: Timeout. vMotion migration [-xxxxxxxxxx:xxxxxxxxxxxxxxxxxx] failed to create a connection with remote host <10.102.1.6>: The ESX hosts failed to connect over the Motion network The vMotion migrations failed because the ESX hosts were not able to connect over the vMotion network. Check the vMotion network settings and physical network configuration.

Cause
- User missed to add vMotion subnet 172.20.11.0/24 while setting members for “ESXi, VR and SRM access through the management gateway” under Management group.
Solution

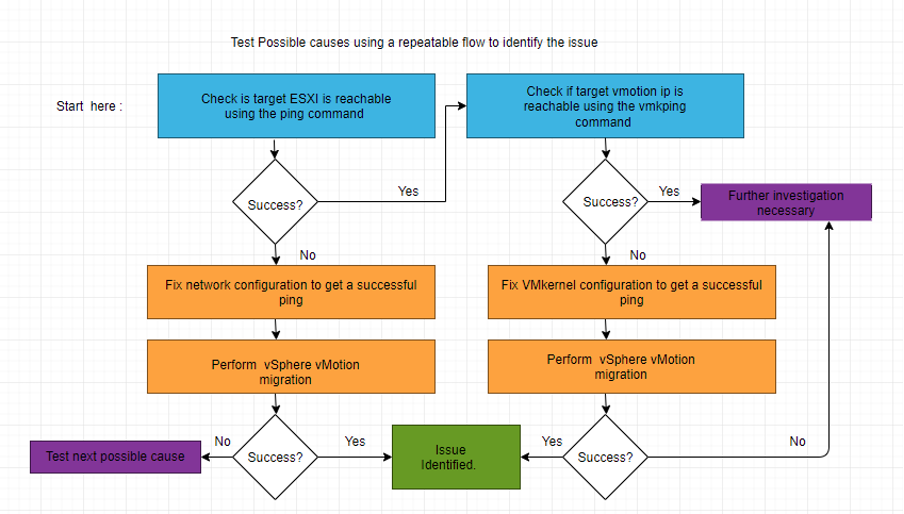
Check vmotion network connectivity.
- SSH to source ESXi host and Run vmkping -I vmk1 <traget esxi vmotion IP>.
vmk1 is source ESXi’s vMotion vmkernel adapter.


- Member IP can be configured from VMware Cloud -> Inventory from navigation pane -> click groups under Network&security.
- Select Management groups.
- Edit esx-vr-srm-mgmt-gw.
- verify IP under view members.
- Add missing IP.
- Check vmotion network connectivity again by following step 1.
- perform the vMotion task again.
Unable to make an HCX Manager connection with the vCenter Server
Symptoms
- Error:”Error communicating to VC endpoint <vCenter FQDN>:443. Reason: HttpHostConnectException”
Cause
- User missed adding the DNS server IP in the Network setting during HCX appliance deployment.
Solution
- Enter the DNS server IP 172.20.10.10 under the network setting of the HCX appliance.

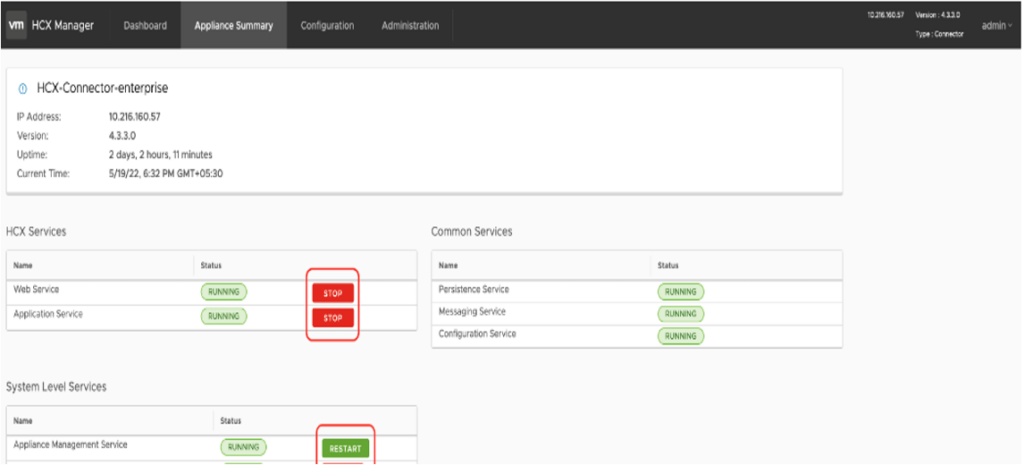
- Restart HCX web service, application service and appliance management service.

- Connect VMware HCX to the on-premises vCenter instance.

